Partitioning in Windows Vista
Partitioning a disk in windows vista is tricky business. I recently went through the exercise so I could install Ubuntu on my laptop and it took all of two days for what should have taken a few minutes. So I am documenting my efforts here and hopefully it will help somebody else save time.
Platform Information
My efforts were on a Sony Vaio laptop with Windows Vista Home Premium installed on it. The hard disk was 10 GB with 40 GB of free space on a single partition.
Partition using disk management
It is recommended that the disk has at least 10 GB of free space for installing Ubuntu. Since I had more than enough, I decided to create a new partition with 25GB space.
Creating a new partition in Vista is simple:
- Right click on my computer and click ‘manage’
- Click ‘continue’ when the user account control window pops up
- When the control panel->system window opens up, click the ‘disk management’ tab under storage.
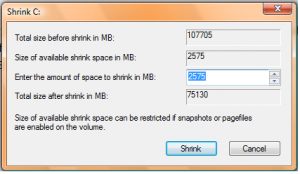
- Click on the drive that you want to partition. Right click and choose the ‘shrink volume’ tab.
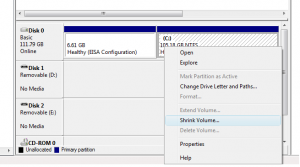
- It will take a few seconds for Vista to figure out how much space is available for creating the new partition. At this point, if you are lucky, Vista will show you the full space that is available as free space for shrinking. Go ahead and enter the space you need for Ubuntu and click ‘ok’. A new partition will be created with the space you entered and will be listed ‘Unallocated’.
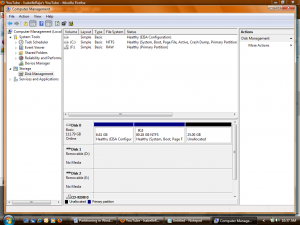
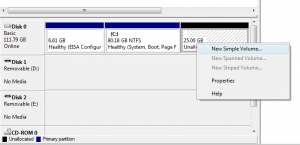
- Right click on the partition and choose ‘New Simple Volume’
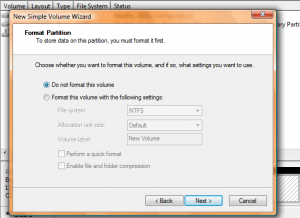
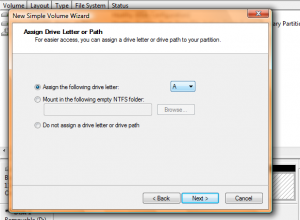
 The New Simple Volume Wizard will open up. Click ‘Next’ on the first screen. The second screen will ask you to choose a drive letter. Choose a letter that is not already assigned to any of your drives. Click ‘Next’.
- If you are partitioning because you want to install Ubuntu, choose ‘Do not format this volume’. When you are done, it will show as a RAW partition. Otherwise, format it as NTFS.
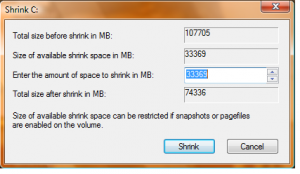
Unfortunately, I was not so lucky. When I did the ‘shrink volume’, this is what I saw. I ran a windows defragmentation. The results were only marginally better. This time, I saw that I had 2 GB available. It was still not enough to make a Linux partition.
After much research (Thanks to Richard Baxter from www.SEOgadget.co.uk for pointing me in the right direction), I have compiled here the various solutions I tried before resolving the problem. I have tried to provide explanations for each step so that even if you run into problems that I did not encounter, you will still be able to find a way out. Hopefully, at the end of following these instructions, you will be able to reclaim all the free space available for shrinking the volume.
Why can’t we shrink the volume?
Windows Vista will be unable to claim free space for a new partition if there are system files scattered around in the free space. Before we see what files are blocking the disk, it would be easier if we simply delete some of the system files that in general take up a lot of space and don’t defragment easily.
Delete system files and free up more space:
Before creating a new partition, free up as much space from your hard disk as possible.
Uninstall Unnecessary Applications
Take this opportunity to uninstall all the applications that you don’t use anymore. This will free up quite a bit of free space.
Disable Hibernation
The hibernation file is a system file that stores hibernation information including any data contained in the memory, CPU and registers. This file is often huge and may take up close to 10GB of hard disk space. To make sure this file is not blocking the disk, disable hybernation.
- Open a command prompt window as administrator
- i. Click start -> type in ‘cmd’ in the search box ->press ctrl+shift+enter
- ii. Click the ‘continue’ tab in the user account control window
- In the command prompt, type
powercfg –h off
Disable Paging
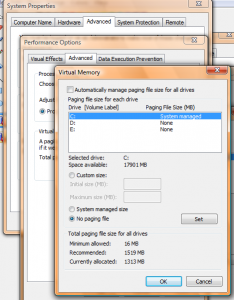
The pagefile is a portion of the hard disk that is used in addition to the RAM to temporarily store and retrieve files and thus speed up your computer. The space allocated for pagefile can be resized. Alternately, you can also disable pagefile so that the entire space on the hard disk allocated for pagefile is freed up. To disable pagefile:
- Right click on ‘My Computer’ and select ‘Properties’.
- Select ‘System Protection’.
- Click ‘Continue’ when the user account control window pops up.
- Click the ‘Advanced’ tab.
- Under ‘Performance’, click ‘Settings’.
- Go to the ‘Advanced’ tab and click ‘Change’.
- Uncheck ‘Automatically manage paging file size for all drives’.
- Select ‘No paging file’. Click ‘Set’ and then ‘Ok’
After you disable the pagefile, it is advised that you do not run any other applications until your disk partitioning is completed successfully. This is because your system will then have to depend solely on the RAM for memory, which may not be enough, resulting in your applications getting crashed.
Disable System Restore:
System restore information is stored in system files called ‘system volume information’. They are stubborn and don’t get defragmented easily, Also, they often reside on the edge of the drive and prevent volume shrinking.
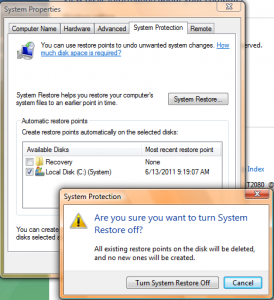
There may be several system restore points in your computer. Let’s delete them all and disable system restore.
- Right click on ‘My Computer’ and select ‘Properties’.
- Select ‘System Protection’.
- Click ‘Continue’ when the user account control window pops up.
- Uncheck the drive for which you want to disable system restore.
Disable Kernel Memory Dump
The kernel memory dump logs the contents of kernel memory when the computer stops unexpectedly. The size of the dump can vary anywhere from 150 MB to 2GB. To disable kernel memory dump,
- Right click on ‘My Computer’ and select ‘Properties’.
- Select ‘System Protection’.
- Click ‘Continue’ when the user account control window pops up.
- Click the ‘Advanced’ tab.
- Click ‘Settings’ under ‘startup and recovery’.
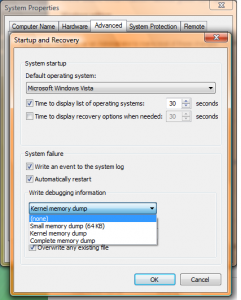
- Under ‘Write debugging information’, select (none). Click OK.
Run Disk Cleanup
Now run the Windows disk cleanup tool.
- Select start->All Programs->Accessories->System Tools->Disk Cleanup.
- Select ‘Files from all users on this computer’
- Choose the ‘More Options’ tab.
- Under ‘System restore and shadow copies’, select ‘clean up’. Choose to delete all the previous restore points in the dialogue box that pops up.
Defragment Using PerfectDisk
PerfectDisk is a defragmenting software from Raxco and can be downloaded from their website: http://www.raxco.com/
It is not free, but there is a 30 day free trial period. Download and install the latest version of PerfectDisk.
Open PerfectDisk after installation. You will see that there are three options under which you can run defragmentation.
- Defrag only
- SMARTPlacement
- Consolidate Free Space
Run defragmentation under all three options for the drive you wish to partition. When you are done, select the ‘Boot Time’ option. Reboot your computer and let PerfectDisk run. This way, PerfectDisk will be able to defragment some of the stubborn system files.
When windows reboots, open PerfectDisk again and this time run ‘Analyze’. At this point, chances are that your drive has enough contiguous free space for partitioning and at the right location. If that is the case, go ahead and attempt to shrink volume again according to the instructions given in the beginning of this document.
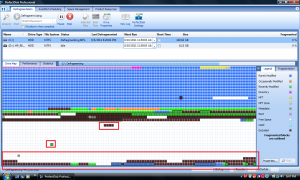
However, if it looked anything like the below, then, your ‘shrink volume’ will still show 0 GB for shrinking, even though your PerfectDisk shows a lot more as available largest free space chunk.
In the above picture, the red boxeshighlight the fragmented blocks that are still blocking windows from being able to partition the drive. If this is what you are facing, there is more work to do before you can successfully partition the drive.
Right click on the colored blocks to find out what files are located in the blocked area.
- Rarely modified/Occasionally modified/recently modified/Directory/Boot: If the files that are blocking contiguous free space are from any of the above category, run defragmentation over and over again until the files move up to the top of the map.
- If you see metadata scattered around in the free space, run the defragmentation again in ‘Boot Time’ mode. This will defragment most of the meta data. If after defragmenting, you still encounter meta data, right click on the block to see the file name names. Then delete the files manually. You may have to do this in the administrator mode.
- If ‘Excluded’ files are blocking free space, then right click to see the file names. If it says ‘System Volume Information’, make sure that all the system restore points are deleted and system restore is disabled completely. Then run the defragmentation again.
- If MFT files are fragmented and blocking free space, run defragmentation again in SMARTPlacement mode. If that does not work, try a different defragmenting program. Mydefrag (http://www.mydefrag.com/) is a freeware application that is worth a try. However, after you run Mydefrag, your MFT files may get defragmented, but your other files may be in a disarray. So run PerfectDisk again, as many times as needed until you are satisfied.
I was able to finally make my disk look like this at the end of the above exercise.
Hopefully, you will too!

